Precious Metal Choices
Landell Flutes are always solid metal, never plated or bonded. Plating is very thin, so it will wear away easily. There are flutes made with a “sandwich” of a thin layer of gold over silver or visa versa. I think that the characteristic quality of the metal is compromised where there are layers of metals of different thicknesses.
I make flutes with sterling silver, Argentium™ Silver, Titanium, and various alloys of gold. Traditional sterling silver is 92.5% fine silver. Argentium silver is a premium quality sterling silver, because it has a small amount of Germanium in the remaining 7.5% of the alloy. This metal looks and works like the Traditional Sterling, of course, but it will not tarnish and turn black. Also, I can soften the metal while I form the parts, and then I can harden the parts in an oven. I also have developed a proprietary head joint made with Titanium. These metals can be combined in various ways to give the flute a mix of tonal colors and response to maximize the expressive virtues of any flutist.
For flutists who have always wanted a gold flute, there are several alloys of gold available, such as 9k, 10k, 14k, and 18k. Gold flutes can be made with all gold keys, or more often they are made with a gold body tube and everything else is silver. There are many other combinations to choose from, which are described here later.
Tone Holes
The tone holes of traditional handmade flutes were each made according to the ‘graduated’ design of Boehm. They were soldered to the tube to exacting dimensions to produce the correct pitches for a specific frequency for ‘concert’ A. By international agreement, the standard pitch was established at A=440 Hz. Modern orchestras have pushed the standard pitch as high as A=444. The flutes made in the early 20th century were generally tuned to A=435 until the 1970’s. The drawn tone hole is extruded by a machine that forms each tone hole from the body tube. The advantage of the drawn tone hole is that there are no soldered joints, which could develop a leak over time. But the positioning of the holes is determined by a machine that makes the location of the holes exactly the same every time. As a result the possibility of making a flute with a different pitch for A is remote, because the machine is generally locked in to a single scale.
Custom handmade flutes with soldered tone holes have another advantage over against drawn tone holes. The drawn tone hole is actually thinner than the thickness of the tube from which it was extruded. Therefore the pad is making contact with a thicker tube that has more mass (substance), and it gives the keys a more positive feel. Also, I find that soldered tone holes have a more vibrant sound than drawn, maybe because the thicker hole acts like the bell of a horn. The thicker tone hole gives me the option of blending the inside of the hole to the tube by hand scraping. This will make less turbulence inside the hole, which is the reason for greater stability in all octaves. Drawn tone holes don’t allow for undercutting because they are so thin.
Professional flutists who use a Landell often tell me that the sound has a “core” and it is very stable. This is partly because the tone holes have been soldered and finished by hand. Normally a drawn tone hole flute is made in a factory where there is very little time to finish the work.
Keys
I offer all the standard options. The following are design choices that don’t affect the price:
- French Model or Covered Keys
- In-line G or Offset G
- A=440 or A=442 or A=444
- Closed G# or Open G#
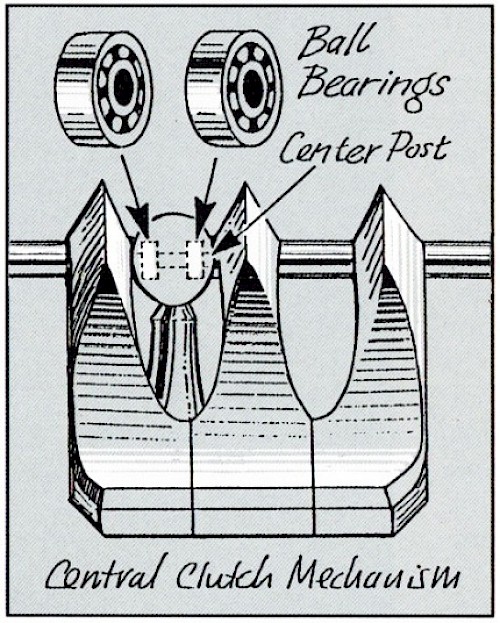
I build the keys with miniature ball bearings for the important right-to-left hand connection. The flute stays in adjustment because there is no friction that causes wear at this point. Other makers use either tapered or straight pin bearings, which have a slower action and loose adjustment over time.
The connections between the independent keys and the dependent keys are usually clutches with paper, cork or hard felt between the contacts. Flutes that are made with screw adjustments are prone to loosing perfect timing between the keys due to vibration, loose threads or tampering by mistake. Professional custom made flutes have used clutches even though they are harder to bring to perfection, because they are very stable, reliable, quiet and tamper-proof.
My flutes have always been carefully fitted with traditional tapered pins, which are made from hard sewing needles. The top and bottom of the pins are rounded, because they will be removed many times and they can be very difficult to use if they become damaged during repairs. They are rounded so the player won’t rip any clothing with them. And the metal is very hard, which makes them durable.
Some modern flute makers offer a “Pinless” mechanism instead of traditional pins. They use a series of bridges around the key work to move the dependent keys. One reason for this design is that there is a mechanical problem playing high F natural to F# in the third octave with in-line G keys. But this problem is easily corrected by careful fitting and padding. The difficulty of making a pinless mechanism is easily offset by building a traditional pinned key set with care.
Within the key set I use 9k white gold spring wire for the springs. I use stainless steel for the hinges because they won’t rust. When I set up the flute at the end, I use hard felt for the thumb and back connection, and I use cork for the kicker to adjust the pad opening. Some makers use felt for the kickers in order to reduce noise when the keys fly open. The big problem is that felt becomes thinner and thinner over time, which will cause the keys to open wider. It happens very gradually, but the end result is a flute that plays much too sharp, because the venting of the notes is larger than necessary.
Padding
Pads for my flutes are available in either a Straubinger™, Schmidt™ or my own hand made Traditional Felt pads.
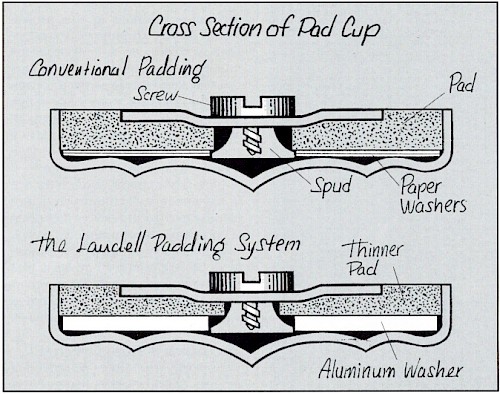
Shims are used to make each pad seal perfectly. I make a solid foundation washer, and I seat the pad with shims as needed. I always hone the tone holes until they are perfectly flat. My goal is to install pads perfectly without using any partial shims. Each pad is thoroughly tested for tiny air leaks from within the flute body and from the surface of the pad with my own pressure measurement equipment.
I make all the pad screws and pad washers with a proprietary design. The screw head has a slot for the screwdriver that has a concave radius. I make my screwdriver with a similar radius, and this shape keeps the screwdriver centered in the screw. The pad washer is made with a threaded hole, which keeps the screw assembled to the washer by a “captive screw” design.
I also make pad washers that are domed or convex. It seems to me that this design projects the sound better than when I use a flat pad washer.
I use hard felt for the thumb keys and back connection. I always use cork under the kickers, because they are completely stable over time, and they are easy to set up perfectly.
I try to pad without any impression from the tone hole. The connection between notes is clearer and more precise when the pad contacts the tone hole without a deep impression.
I try to regulate the spring tension to 17 grams unless the flutist needs something else.
When the flute is playable, I use it for about a week in my studio and make small adjustments.
When I’m satisfied, I disassemble the flute, cleaning the body and keys, and polish the body one last time. Often there are small scratches from a tool on the bench, which I remove.
Reassembly for the last time requires gloved hands and fresh oil. My magnahelic pressure meter tells me if all the pads seal perfectly and the connections are well adjusted.
Finish
My flutes are polished by hand using a muslin buffing wheel with either Tripoli or Rouge. The early metal flute makers finished all the surfaces with a burnisher (smooth hard tool). I burnish the keys before buffing them, because that gives the flute a sharp bevel when it’s new.
Sometimes a silver key has something called “fire scale”, which is a reddish color spot that is difficult to remove. This is a deep tarnish the results from brazing with the torch. Some makers use a chemical bath of Potassium Cyanide and Hydrogen Peroxide to strip it off. One benefit of Argentium™ Silver is that it never tarnishes, and therefore it never develops Fire Scale. Even with a traditional sterling silver flute, I don’t use these chemicals because they pollute our land.
Powder Coating is a very effective finish for titanium, because it’s durable and deepens the sound. It’s available in a variety of colors, too.
Tumbling or Vibration Polishing is something I would never use.
Traditional Hand Engraving
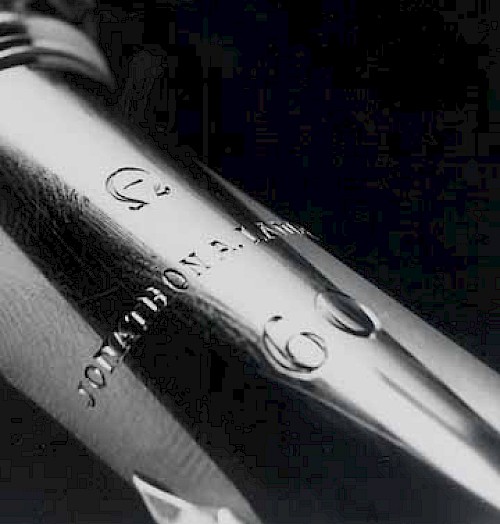
I engrave my name, my logo and a serial number on every part of the flute, which gives it an identity in the line. I admired Verne Powell for engraving his name on every flute he made, and that's true for many earlier flute makers as well. Ed Almeida showed me the basics of hand engraving, and I found a master engraver in Boston to teach me the skill. Hand engraving has a certain irregular appearance that isn’t true of machine engraving. It is also totally flexible.
For the Lip Plate I have a few patterns that were taken from antique flutes made by Rittershausen. It gives stability for the player under warm playing conditions. Custom patterns are possible on new commissions.
Custom Options
For many years I have offered the option of making a flute with covered key left hand and open hole right hand. Albert Cooper told me that this would have the best intonation in the third octave, and it would relieve the left hand of some tension. So far, no one has taken up the idea.
The Lower G key has been a problem since flutists demanded a closed G# key, because high E has been difficult to play. The most common solution is the Split E optional design, but a simpler solution would be a split G key without the E connection. Other options are to solder a small ‘half moon’ shaped patch inside the tone hole, or make the flute with a small trill sized tone hole in place of the lower G with a similar small trill cup over it.
The D# Roller key can be enhanced with a roller on the C# lever.
Key extensions are helpful for people with special needs.
Old flutes were always made with a ‘Crutch’ and a ‘Wart’ that make the flute more stable.
The Split-E option can be made with a ‘switch’ that disables the key for a 3rd octave trill.
One Piece Body and Foot option makes the flute body one piece with the foot joint.
Convertible B/C Foot makes it possible to have both foot joints combined into one design.
D Foot Joint is a short foot with only a D# key
Bb Foot Extension is a short piece of body tube that fits the end of the B foot for a low Bb.
Adjustment Screws with a Nylon tip will make a very quiet connection with precise adjustments.
Gold Appointments are decorative parts made of Rose Gold.
Twisted Crown Ring is a design that looks like two pieces of wire twisted together around the crown. It could be made in gold.
Open G# is the original design of Boehm, where the G# key is not opened but closed by the Left Hand 5th finger. I make that design with posts on the ribs that would easily convert the flute to the common Closed G# key, if the flute is sold to someone who wants only the popular Closed G# Key design.
Gems on the flute are very special, but not yet very popular. I have made lip plates with engraving and gem settings that are very beautiful. I also have a very beautiful crown ring design with 24 stones that is very striking.
Coltman C# Key is an improvement that I have not attempted yet.
Jack Moore’s C# Trill key is another such design waiting for a commission.
Underslung Split-E is an improvement over the more common bridge which I have made several times. Although very difficult to build, it has been a great success for the flutist commissioner.
Download Our Current Information (PDF)

Follow us
 @jonlandell
Contact us
Landell Flutes LLC
332 Main St, Wampum
PA 16157 USA
Phone (724) 740-1093
jonathon.landell@gmail.com
“There are over 180 handmade Landell flutes in silver and gold,
and one prototype flute in titanium. Innovation has been my hallmark.
Hard work has been the means.”
Jonathon A. Landell